Skin Care


Managing Fine Lines and Wrinkles: Tips and Tricks
As we age, the natural process of skin aging takes a visible toll in the form of fine lines and wrinkles. These marks of maturity, while a normal part of the aging journey, are often unwelcome. Thankfully, advancements in skincare science have offered us several effective ingredients to help mitigate these signs. Among these, retinoids, hyaluronic acid, and idebenone stand out due to their proven benefits. In this blog, we will explore how these ingredients work and provide practical tips on how to incorporate them into your skincare regimen to help manage and reduce the appearance of fine lines and wrinkles. Understanding Skin Aging Before diving into the specifics of these miraculous ingredients, it’s important to understand the basic mechanisms of skin aging. Skin aging can be influenced by various factors, including genetics, environmental exposure (like UV rays and pollution), lifestyle choices (such as diet and smoking), and natural physiological changes (like decreased collagen production). These factors can lead to the breakdown of skin structure and loss of moisture, both of which play a crucial role in the development of fine lines and wrinkles. The Power of Retinoids Retinoids are derivatives of Vitamin A and are widely revered in the skincare world for their ability to combat signs of aging. They work by promoting cell turnover and stimulating collagen production, which can help reduce the visibility of fine lines and wrinkles. Additionally, retinoids can improve skin texture and tone, contributing to a more youthful and radiant complexion. Tips for Using Retinoids: Start Slowly: Retinoids can be potent, so it’s important to start with a lower concentration and gradually increase as your skin becomes accustomed to the ingredient. Nightly Use: Apply retinoids in the evening as they can make your skin more sensitive to sunlight. Sun Protection: Always use a broad-spectrum sunscreen during the day, as retinoids can increase your skin’s sensitivity to UV rays. Hyaluronic Acid: A Hydration Powerhouse Hyaluronic acid is a naturally occurring substance in our skin known for its stunning capacity to attract and hold vast amounts of moisture. This ingredient can help keep the skin plump, hydrated, and youthful-looking. Hyaluronic acid works by helping to retain moisture in the skin, which can diminish the appearance of fine lines and provide a smoothing effect. Tips for Using Hyaluronic Acid: Layer Wisely: Apply hyaluronic acid products on damp skin to lock in moisture. Combine with Moisturizers: Use it under your regular moisturizer to maximize hydration, especially if you have dry skin. All Skin Types: Hyaluronic acid is beneficial for all skin types, from oily to very dry. Idebenone: The Antioxidant Protector Idebenone is a lesser-known but highly effective antioxidant related to Coenzyme Q10. It functions by protecting the skin from environmental damage caused by free radicals, which can accelerate skin aging. Idebenone has also been shown to improve the appearance of fine lines and wrinkles by enhancing skin resilience and texture. Tips for Using Idebenone: Patch Test: Always perform a patch test to check for any allergic reactions before starting full application. Morning or Night: Idebenone can be used during the day or evening. If used in the morning, follow up with sunscreen. Combine for Enhanced Effects: Consider using idebenone in conjunction with other antioxidants like vitamin C for compounded anti-aging benefits. Integrating Ingredients into Your Routine Managing the introduction of these powerful ingredients into your skincare routine requires a balanced approach. Here’s how you can integrate them effectively: Consult with a Dermatologist: Before starting any new skincare treatment, especially with active ingredients like retinoids and idebenone, it’s wise to consult with a dermatologist. They can provide personalized advice based on your skin type and needs. Patch Testing: As with any skincare product, start by performing a patch test to ensure you don’t have an adverse reaction to the ingredients. Sequential Introduction: Start with one product and introduce new products gradually to avoid overwhelming your skin and to isolate any potential reactions. Listen to Your Skin: Pay attention to how your skin responds to each ingredient. Some may experience irritation, in which case it’s important to adjust the usage accordingly. Conclusion Fine lines and wrinkles are a natural part of aging, but they don’t have to dominate your appearance. With the correct application of retinoids, hyaluronic acid, and idebenone, you can significantly reduce their visibility and improve your skin’s overall health and vitality. By following the tips provided and consulting with skincare professionals, you can create a tailored approach that allows your skin to thrive at any age.
Learn more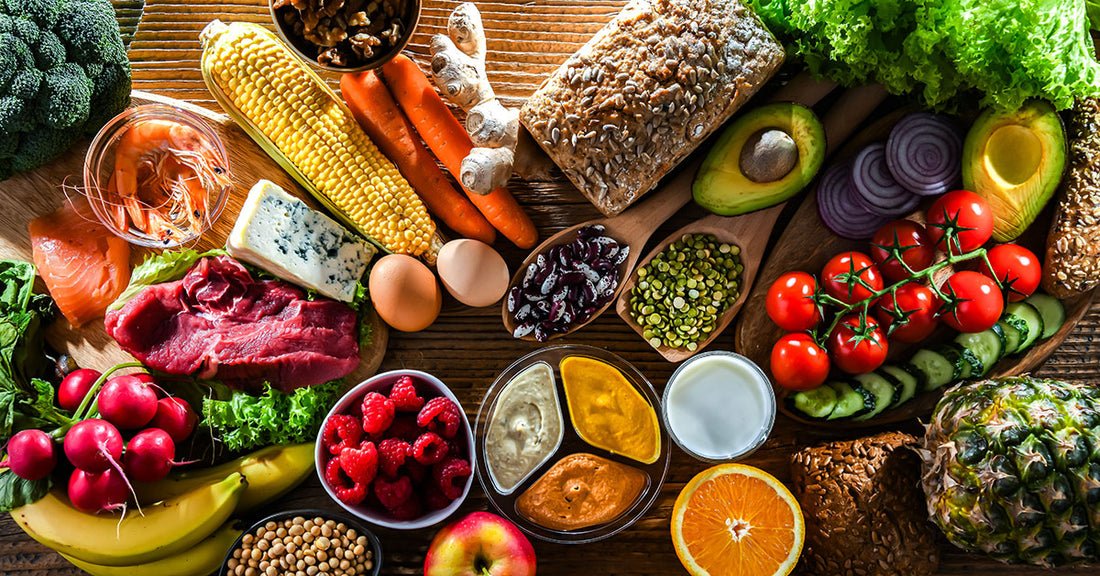
Top 10 Anti-Aging Foods for Radiant Skin: A Guide for Women Over 50
Aging gracefully is an art form, and as women over 50, we've become experts in the craft. We understand that while the passage of time is inevitable, the way we care for ourselves can profoundly influence how we look and feel. Our skin, in particular, serves as a canvas that reflects our inner vitality and health. While skincare products certainly play a role in our beauty routines, the real secret to radiant, youthful skin lies in the foods we eat. In this comprehensive guide, we'll delve deep into the world of anti-aging foods, exploring the top 10 ingredients that can help you achieve and maintain that coveted glow well into your golden years. From antioxidant-rich berries to omega-3-packed fatty fish, we'll uncover the nutritional treasures that can transform your skin from the inside out. Berries: Nature's Antioxidant Powerhouses Berries are more than just sweet treats – they're nutritional powerhouses packed with antioxidants, vitamins, and minerals that work wonders for your skin. Blueberries, strawberries, raspberries, and blackberries are bursting with anthocyanins, flavonoids, and vitamin C, all of which help combat free radicals and protect against oxidative stress. These tiny fruits also promote collagen production, keeping your skin firm and resilient. Whether enjoyed fresh, blended into smoothies, or sprinkled over yogurt, incorporating a variety of berries into your diet is a delicious way to support your skin's health and vitality. Avocado: Creamy Goodness for Youthful Skin Avocado toast may be trendy, but the benefits of this creamy fruit extend far beyond social media fame. Rich in healthy fats, particularly omega-3s, avocados help nourish and hydrate the skin from within, reducing the appearance of fine lines and wrinkles. They're also packed with vitamins E and C, two potent antioxidants that protect against environmental damage and promote skin repair. Whether mashed into guacamole, sliced onto salads, or blended into creamy smoothies, avocados are a versatile and delicious addition to any anti-aging diet. Fatty Fish: Your Skin's Best Friend When it comes to youthful skin, fatty fish like salmon, mackerel, and sardines are true superstars. These cold-water fish are rich in omega-3 fatty acids, essential nutrients that support skin health in countless ways. Omega-3s help maintain the skin's lipid barrier, preventing moisture loss and keeping your complexion soft and supple. Additionally, fish contain astaxanthin, a powerful antioxidant that reduces inflammation and improves skin elasticity. Whether grilled, baked, or poached, incorporating fatty fish into your weekly meals can help you achieve that coveted lit-from-within glow. Nuts and Seeds: Nutritional Nuggets for Radiant Skin Almonds, walnuts, flaxseeds, and chia seeds may be small in size, but they pack a mighty nutritional punch. Rich in vitamins, minerals, and healthy fats, nuts and seeds are essential for supporting healthy, youthful skin. Almonds are a great source of vitamin E, a potent antioxidant that protects against UV damage and promotes skin repair. Walnuts are high in omega-3 fatty acids, which help maintain skin elasticity and hydration. Flaxseeds and chia seeds are rich in alpha-linolenic acid (ALA), a type of omega-3 fatty acid that reduces inflammation and supports overall skin health. Whether sprinkled over oatmeal, blended into smoothies, or enjoyed as a crunchy snack, nuts and seeds are a convenient and delicious way to nourish your skin from the inside out. Leafy Greens: The Ultimate Beauty Boosters Dark, leafy greens like spinach, kale, and Swiss chard are nutritional powerhouses that can do wonders for your skin. Packed with vitamins A, C, and K, as well as antioxidants like lutein and zeaxanthin, these greens help protect against UV damage, reduce inflammation, and promote skin regeneration. Vitamin A, in particular, plays a crucial role in skin cell turnover and repair, helping to maintain a smooth, youthful complexion. Whether sautéed, steamed, or blended into green smoothies, incorporating plenty of leafy greens into your diet is a surefire way to support your skin's health and radiance. Tomatoes: A Skin-Saving Superfood Tomatoes are more than just a versatile kitchen staple – they're also a potent ally in the fight against aging skin. Rich in lycopene, a powerful antioxidant that gives them their vibrant red color, tomatoes help neutralize free radicals and protect against oxidative damage. Lycopene has been shown to reduce inflammation, improve skin texture, and even protect against sunburn. Cooking tomatoes releases even more lycopene, so don't hesitate to incorporate them into your favorite soups, sauces, and stews for maximum benefit. Whether enjoyed fresh or cooked, tomatoes are a delicious addition to any anti-aging diet. Green Tea: Sip Your Way to Youthful Skin Green tea isn't just a soothing beverage – it's also a potent elixir for youthful skin. Loaded with catechins, powerful antioxidants that help fight inflammation and protect against UV damage, green tea can help improve skin texture and reduce the signs of aging. Additionally, green tea contains compounds that promote collagen production, helping to keep your skin firm and resilient. Whether enjoyed hot or cold, green tea is a refreshing and revitalizing addition to your daily routine. Sweet Potatoes: Nature's Skincare Secret Sweet potatoes are not only delicious but also incredibly nourishing for your skin. Packed with beta-carotene, a precursor to vitamin A, sweet potatoes help support skin cell turnover and repair, resulting in a smoother, more youthful complexion. Beta-carotene also acts as a natural sunblock, helping to protect against UV damage and prevent premature aging. Whether roasted, mashed, or baked into fries, sweet potatoes are a tasty and nutritious addition to any anti-aging diet. Citrus Fruits: Vitamin C Powerhouses Oranges, lemons, grapefruits, and other citrus fruits are bursting with vitamin C, a nutrient that plays a crucial role in collagen synthesis and skin repair. Vitamin C also has powerful antioxidant properties that help protect against environmental damage and promote a bright, even complexion. Starting your day with a glass of freshly squeezed citrus juice is a delicious way to kick-start your skin's natural rejuvenation process. Whether eaten whole or juiced, citrus fruits are a refreshing and revitalizing addition to any anti-aging diet. Dark Chocolate: Indulge Your Way to Youthful Skin Yes, you read that right – dark chocolate can actually be good for your skin! Dark chocolate with a high cocoa content is rich in flavonoids, powerful antioxidants that help improve blood flow to the skin and protect against UV damage. Additionally, dark chocolate contains compounds that promote hydration and reduce inflammation, resulting in a smoother, more radiant complexion. Indulging in a square or two of dark chocolate each day can be a delicious and guilt-free way to support your skin's health and vitality. Conclusion: As women over 50, we understand that true beauty comes from within – and that includes what we put into our bodies. By incorporating these top 10 anti-aging foods into your diet, you can nourish your skin from the inside out
Learn more
Food Sources That Support Healthy Skin: A Guide to Glowing From Within
In the quest for radiant, youthful skin, our kitchen pantry holds more secrets than we might think. Beyond the external applications and skincare routines, the foundation of healthy skin lies in what we consume. This article delves into various food sources that are not just nourishment for the body but also fuel for our skin's health, accompanied by some delightful recipes to incorporate these ingredients into our daily diet. 1. Fatty Fish Omega-3 fatty acids found in fish like salmon, mackerel, and herring are pivotal for maintaining skin health. They help keep skin thick, supple, and moisturized. Omega-3s also reduce inflammation, which can cause redness and acne. Furthermore, fish is a source of vitamin E, a critical antioxidant for the skin. Recipe to try: Grilled Salmon with Avocado Salsa. This dish combines the omega-3 rich salmon with avocado, another excellent source of healthy fats and vitamins C and E. 2. Avocados Avocados are not just for guacamole; they're a powerhouse of vitamins E and C, both antioxidants that protect skin cells from oxidative damage. The healthy fats in avocados also promote skin flexibility and moisture retention. Recipe to try: Avocado Toast with Egg. It’s a simple yet nutritious meal that kickstarts your day with healthy fats, vitamins, and protein. 3. Walnuts Walnuts are a fantastic source of essential fatty acids, which your body cannot produce itself. They are richer in both omega-3 and omega-6 fatty acids compared to most other nuts, balancing skin health and reducing inflammation. Recipe to try: Walnut and Spinach Pesto Pasta. This dish incorporates walnuts not just for their health benefits but also for a nutty flavor that complements the pesto. 4. Sweet Potatoes Beta-carotene, a nutrient found in plants, converts to vitamin A in the body and is found in abundance in sweet potatoes. This antioxidant acts as a natural sunblock and protects the skin from sun damage. Recipe to try: Baked Sweet Potato Fries. A healthier alternative to traditional fries, these are easy to make and rich in beta-carotene. 5. Red or Yellow Bell Peppers Like sweet potatoes, bell peppers are an excellent source of beta-carotene. They are also one of the best sources of vitamin C, necessary for creating collagen that keeps skin firm and strong. Recipe to try: Bell Pepper and Beef Stir-Fry. A vibrant and healthy way to enjoy your vegetables while getting a boost of vitamin C. 6. Broccoli Broccoli is full of vitamins and minerals important for skin health, including zinc, vitamin A, and vitamin C. It also contains lutein, a carotenoid that works like beta-carotene, protecting the skin from oxidative damage. Recipe to try: Broccoli Salad with Almonds and Yogurt Dressing. This salad is not only packed with skin-friendly ingredients but also dressed in a healthy, probiotic-rich yogurt dressing. 7. Tomatoes Tomatoes are a great source of vitamin C and contain all of the major carotenoids, including lycopene. These carotenoids protect the skin from sun damage and may help prevent wrinkling. Recipe to try: Tomato and Basil Bruschetta. A fresh and easy appetizer that pairs the antioxidant-rich tomatoes with whole-grain bread. 8. Dark Chocolate Cocoa contains antioxidants that may help improve the thickness and hydration of the skin. For the best benefits, choose dark chocolate with at least 70% cocoa content. Recipe to try: Dark Chocolate and Almond Bark. This simple treat combines the antioxidant benefits of dark chocolate with the healthy fats of almonds. 9. Green Tea Green tea’s catechins are powerful antioxidants that can protect the skin against sun damage and reduce redness, as well as improve its hydration, thickness, and elasticity. Recipe to try: Iced Green Tea with Lemon and Ginger. A refreshing drink that provides a dose of antioxidants, perfect for hydrating on a hot day. 10. Red Grapes Resveratrol, found in the skin of red grapes, may slow your skin's aging process by impairing harmful free radicals that damage the skin. This compound also has significant anti-inflammatory benefits. Recipe to try: Red Grape and Walnut Salad. A delicious and antioxidant-rich salad that combines the health benefits of red grapes with the omega-3 fatty acids of walnuts. Conclusion The journey to healthier skin is not solely about what you apply externally but significantly influenced by what you consume. Incorporating these foods into your diet can help protect your skin from the inside out, ensuring it remains healthy, vibrant, and youthful. The recipes mentioned are a starting point to integrate these skin-nourishing foods into your daily meals, combining the joy of eating with the benefits of glowing skin. As we've explored, the key to unlocking radiant skin lies within our meals. By choosing foods rich in antioxidants, essential fatty acids, vitamins, and minerals, we're not just feeding our bodies but also nurturing our skin's health. Remember, consistency is key. Regularly incorporating these foods into your diet will gradually reveal their benefits, leading to visible improvements in your skin's texture, elasticity, and overall appearance. So, dive into the recipes, enjoy the flavors, and embark on a journey to radiant, healthy skin that shines from within.
Learn more
The Bright Side of Sunshine: Nourishing Your Skin and Body with Moderation
In the realm of skincare, the conversation around sun exposure has often veered towards caution, highlighting the risks of UV radiation. However, at Hygieia, we believe in embracing the holistic approach towards skincare and wellness, recognizing that, in moderation, sunshine can be a potent ally for both your skin and overall health. This balanced viewpoint underscores the essence of our brand—named after the Greek goddess of health, cleanliness, and hygiene—where we embrace nature’s gifts, guided by the wisdom of moderation. In this article, we'll explore the sunny side of sun exposure, delving into how controlled sunshine can benefit your skin and body, thereby supporting the philosophy behind Hygieia's skincare solutions. The Sunshine Vitamin: A Beacon of Health Vitamin D, often dubbed the "sunshine vitamin," stands as a testament to the symbiotic relationship between sunlight and health. Our bodies synthesize this essential nutrient when our skin is exposed to the sun's UVB rays, triggering a cascade of health benefits that resonate through every cell and tissue. Skin Health and Beyond Moderate sun exposure accelerates the production of Vitamin D, which plays a pivotal role in skin health. It promotes cell growth, repair, and metabolism, enhancing the skin's immune system and helping to destroy free radicals that can cause premature aging. But the benefits of Vitamin D extend far beyond the skin’s surface. It's crucial for bone health, aiding in the absorption of calcium and phosphorus. Additionally, it bolsters the immune system, enhances mood by fighting off depression, and may reduce the risk of multiple sclerosis, heart disease, and certain forms of cancer. The Golden Hour: Basking in Moderation At Hygieia, we advocate for the "Golden Hour"—the serene window shortly after sunrise or before sunset—when the sun’s rays are gentle, and its warmth kisses the skin without the harsh intensity found at midday. This period not only minimizes the risk of UV damage but also envelops you in a soothing ambiance that nurtures the soul as much as it does the skin. A Harmony of Light and Shadow Embracing sunlight in moderation is akin to a delicate dance—a harmony of light and shadow. It's about finding that sweet spot where the sun’s benefits are maximized, and its risks minimized. For optimal Vitamin D synthesis, exposing your skin to the sun for about 10 to 15 minutes a day, depending on your skin type and geographic location, can be sufficient. Post this brief communion with the sun, it's crucial to shield your skin, either by seeking shade or wearing protective clothing and broad-spectrum sunscreen, a staple in Hygieia's skincare line. Sunshine and Mental Wellbeing: A Luminous Link The interplay between sunlight and mental health is profound. Exposure to natural light helps regulate our circadian rhythms, improving sleep quality and boosting our mood. Sunlight triggers the release of serotonin, a neurotransmitter associated with feelings of happiness and well-being. This biological response to sunlight is a gentle reminder of our intrinsic connection to nature and the importance of stepping outside to embrace the daylight, even if just for a few minutes each day. Sun Protection: A Pillar of Skincare While we celebrate the sun's gifts, protection remains paramount. Hygieia’s range of sun care products is designed to complement your daily dose of sunshine, ensuring your skin is shielded when you step beyond the recommended exposure. Our sunscreens, enriched with natural antioxidants, offer broad-spectrum protection against UVA and UVB rays, mitigating the risk of skin damage and premature aging. Embracing the Sun with Hygieia Incorporating moderate sun exposure into your wellness routine can yield significant benefits for your skin and overall health. By understanding the importance of moderation and protection, we can forge a relationship with the sun that is both nurturing and respectful. Hygieia stands at the intersection of nature and science, crafting skincare solutions that protect, nourish, and celebrate your skin in all its radiant glory. As we navigate the journey towards holistic wellness, let us bask in the golden rays of the sun—mindfully and with gratitude—for the vitality and joy it brings to our lives. In conclusion, the sunshine offers a plethora of benefits that extend beyond mere Vitamin D synthesis. It enhances mood, supports immune function, and plays a critical role in the health of our skin. By embracing the sun in moderation and equipping ourselves with protective skincare, we can enjoy the best of both worlds. Let Hygieia guide you through a balanced approach to sun exposure, where the harmony between embracing the natural and safeguarding your health is beautifully maintained. Embrace the light, but never forget the wisdom in the shade.
Learn more
Photodamage Repair in Skincare: The Science Behind Idebenone
In the vast world of skincare, a myriad of ingredients claim to be the elixir for youthful, radiant skin. Amid this crowded space, Idebenone emerges as a potent antioxidant with compelling evidence supporting its role in repairing photodamaged skin. At Hygieia Skincare, we are committed to bringing the forefront of scientific innovation to your skincare routine. In this deep dive, we explore the proven science behind Idebenone, its mechanisms of action, and why it might just be the missing link in your quest for flawless skin. Understanding Photodamage Before we delve into the wonders of Idebenone, it's crucial to understand what we're up against. Photodamage, or sun damage, results from prolonged exposure to ultraviolet (UV) radiation, leading to a spectrum of skin issues from premature aging (photoaging) to increased risk of skin cancers. UV radiation generates free radicals, unstable molecules that wreak havoc on our skin's cellular structures, leading to the breakdown of collagen, inflammation, and DNA damage. Enter Idebenone: A Powerful Antioxidant Idebenone (pronounced eye-deb-eh-known) is a synthetic analogue of Coenzyme Q10 (CoQ10), a vital antioxidant naturally present in our skin. However, what sets Idebenone apart is its superior stability and potency. Its low molecular weight allows it to penetrate deeply into the skin, providing robust protection against free radical damage. The Science of Idebenone Numerous studies have shed light on Idebenone's efficacy in combating photodamage. A pivotal study published in the "Journal of Cosmetic Dermatology" highlights its ability to reduce fine lines and wrinkles, improve hydration, and enhance overall skin texture. Idebenone's antioxidant activity has been measured using the Environmental Protection Factor (EPF®), where it scored an impressive 95 out of 100, outperforming other well-known antioxidants like Vitamin C and E. Mechanisms of Action Idebenone's magic lies in its multifaceted approach to skin repair: Antioxidant Protection: By scavenging free radicals, Idebenone prevents the oxidative stress that leads to collagen breakdown and skin aging. Mitochondrial Support: It helps maintain mitochondrial function, crucial for cellular energy production and repair mechanisms. Anti-inflammatory Effects: Idebenone has shown to reduce inflammation, a key factor in the development of photoaging and skin cancers. Clinical Evidence Clinical trials provide compelling evidence of Idebenone's benefits. In a randomized, double-blind study involving subjects with photodamaged skin, those treated with an Idebenone-containing cream showed significant improvements in fine lines, wrinkles, and skin texture compared to the placebo group. Moreover, histological analyses confirmed an increase in collagen production, further validating its regenerative capabilities. Beyond Photodamage: Idebenone's Broader Benefits While Idebenone's prowess in repairing photodamaged skin is remarkable, its benefits extend further: Hyperpigmentation: It helps in reducing the appearance of age spots and uneven skin tone. Skin Resilience: By bolstering the skin's antioxidant defense system, Idebenone enhances its ability to withstand environmental stressors. Hydration: It aids in maintaining skin hydration levels, vital for a healthy skin barrier function. Incorporating Idebenone into Your Skincare Routine For those looking to integrate Idebenone into their skincare regimen, here are a few tips: Start with a patch test to ensure compatibility, especially for sensitive skin types. Use it in your morning routine to leverage its antioxidant properties for daytime protection against UV radiation and pollution. Pair with sunscreen: While Idebenone fights free radical damage, it does not substitute the need for broad-spectrum sunscreen, the cornerstone of any skincare routine aimed at combating photodamage. Consistency is key: Like with any skincare ingredient, regular use is essential to reap the full benefits. Safety Profile Idebenone is well-tolerated by most skin types. However, as with any active ingredient, a small percentage of individuals might experience sensitivity. Consulting with a dermatologist before introducing Idebenone into your skincare routine is advisable, particularly for those with existing skin conditions. The Future of Skincare with Idebenone At Hygieia Skincare, we believe in the power of science to unlock the secrets to radiant, healthy skin. Idebenone represents a leap forward in our understanding and treatment of photodamage. By incorporating this powerhouse antioxidant into our formulations, we are not just offering a product; we're providing a solution rooted in rigorous scientific research and proven results. As we continue to explore the potential of Idebenone and other innovative ingredients, our commitment remains unwavering: to deliver skincare solutions that are not only effective but also safe and sustainable. The journey to flawless skin is a complex one, but with Idebenone, we are one step closer to unveiling the luminous, resilient skin that lies beneath the surface of photodamage. Conclusion The science behind Idebenone is a testament to the advancements in dermatological research and its application in skincare. Its proven efficacy in repairing photodamaged skin, coupled with its broader benefits, makes it a cornerstone ingredient for anyone looking to revitalize their skin. At Hygieia Skincare, we are proud to harness the power of Idebenone, offering our customers a beacon of hope in their quest for ageless beauty. Join us in embracing the science of skincare, where every drop of Idebenone brings us closer to achieving the zenith of skin health and vitality.
Learn more
The Transformative Power of Retinol in Anti-Aging: A Deep Dive
In the world of skin care, few ingredients have garnered as much acclaim and attention as retinol. Renowned for its potent anti-aging properties, retinol has become a cornerstone in the routines of those seeking to maintain youthful, vibrant skin. At Hygieia Skin Care, we're passionate about harnessing the power of retinol to help our clients achieve their skin health goals. Let's embark on a comprehensive exploration of retinol's transformative effects and understand why it's considered a gold standard in anti-aging skin care. What Is Retinol? Retinol is a derivative of vitamin A, one of the body's key nutrients for cell growth and health. In the realm of skin care, retinol is celebrated for its ability to promote skin renewal, enhance collagen production, and diminish the appearance of fine lines and wrinkles. Its efficacy stems from its ability to penetrate deep into the skin, where it accelerates cell turnover and fights the signs of aging at their source. The Anti-Aging Benefits of Retinol Stimulates Collagen Production Collagen is the scaffolding of the skin, providing structure, elasticity, and firmness. As we age, collagen production naturally declines, leading to the formation of wrinkles and sagging skin. Retinol counteracts this process by stimulating collagen production, thereby improving skin texture and reducing the appearance of fine lines and wrinkles. Accelerates Cell Turnover One of the hallmarks of youthful skin is its ability to rapidly regenerate. Retinol accelerates this process, encouraging the shedding of old, dull skin cells and the emergence of new, vibrant cells. This not only helps to diminish the appearance of aging but also contributes to a brighter, more radiant complexion. Fades Age Spots and Hyperpigmentation Age spots and hyperpigmentation are common signs of aging and sun damage. Retinol's ability to accelerate cell turnover also aids in the gradual fading of these discolorations, leading to a more even skin tone and texture. Minimizes Pores Enlarged pores can detract from the smooth appearance of the skin. Retinol helps to refine the skin's texture by promoting the reduction of pore size. This is achieved through its stimulating effect on collagen production, which in turn supports the elasticity and structure of the pore walls. Combats Acne While not exclusively an anti-aging benefit, retinol's ability to unclog pores and reduce breakouts is a boon for adults battling acne. By promoting cell turnover and reducing the accumulation of dead skin cells, retinol can help manage acne and prevent future breakouts, contributing to a clearer, more youthful complexion. Incorporating Retinol into Your Skin Care Routine Start Slow Retinol is potent, so it's crucial to introduce it gradually into your skin care routine. Start with a low concentration and apply it sparingly, gradually increasing the frequency and concentration as your skin adjusts. Use at Night Retinol can make your skin more sensitive to sunlight, so it's best applied at night. This also aligns with the skin's natural repair cycle, enhancing the ingredient's effectiveness. Don't Forget Sunscreen The increased cell turnover induced by retinol can make your skin more susceptible to UV damage. A broad-spectrum sunscreen is a must during the day, even if you only apply retinol at night. Moisturize Retinol can be drying, especially in the initial stages of use. Incorporate a hydrating moisturizer into your routine to counteract any dryness and keep your skin supple. Be Patient The benefits of retinol, while significant, don't happen overnight. Consistent use over several weeks to months is necessary to see noticeable improvements in skin texture, tone, and appearance. Tailoring Retinol Use for Different Skin Types Sensitive Skin If you have sensitive skin, opt for a retinol formulation designed for sensitivity, and start with the lowest concentration. Incorporating a soothing moisturizer can also help mitigate potential irritation. Oily and Acne-Prone Skin Those with oily or acne-prone skin may benefit from retinol's pore-refining and acne-reducing properties. Look for non-comedogenic formulations that won't clog pores. Dry Skin For dry skin types, hydration is key. Choose a retinol product that includes moisturizing ingredients, and layer with a rich moisturizer to combat any dryness. Mature Skin Mature skin can greatly benefit from retinol's collagen-boosting and cell-renewing properties. Higher concentrations may be more effective for addressing deep wrinkles and loss of firmness, but should be approached with caution to avoid irritation. The Bottom Line Retinol is a powerhouse ingredient in the fight against aging, offering a multitude of benefits from smoothing fine lines and wrinkles to improving skin texture and tone. At Hygieia Skin Care, we're committed to providing our clients with the highest quality retinol formulations, tailored to meet the needs of various skin types and concerns. Incorporating retinol into your skin care routine can be a game-changer, revealing a more youthful, radiant complexion that glows from within. Remember, the journey to healthier, younger-looking skin is a marathon, not a sprint. With patience, consistency, and the right retinol product, you can achieve remarkable anti-aging results. Embrace the transformative power of retinol and witness the revitalization of your skin with Hygieia Skin Care.
Learn more
The Holistic Impact of Healthy Skin on Overall Health: Insights from Hygieia Skincare
Skin, the largest organ of the human body, does more than just wrap and protect our internal systems. It plays a crucial role in our overall health and well-being. At Hygieia Skincare, we understand that maintaining healthy skin is not just about aesthetic appeal, but also about promoting holistic health. This blog explores how nurturing your skin can positively impact various aspects of your health. The Skin-Health Connection: More Than Skin Deep 1. Boosts Mental and Emotional Well-Being The appearance and health of our skin significantly influence our self-esteem and confidence. Skin issues like acne, psoriasis, or eczema can lead to social anxiety, depression, and lowered self-esteem. By taking care of your skin, you not only enhance its appearance but also boost your mental and emotional well-being. A clear and healthy complexion contributes to a positive body image, enhancing overall mental health. 2. Strengthens the Immune Barrier The skin is the first line of defense against environmental aggressors like pathogens, pollutants, and harmful UV rays. A healthy skin barrier prevents the entry of these harmful agents, thereby reducing the risk of infections and diseases. Proper skincare, including hydration and protection from sun exposure, strengthens this barrier, supporting the body's immune response. 3. Enhances Sensory Function Skin is a sensory organ rich in receptors that respond to touch, temperature, and pain. Healthy skin ensures these sensory functions work optimally, allowing you to respond appropriately to environmental stimuli. For instance, the ability to feel pain is crucial for avoiding harmful situations, while touch influences emotional and physical connections. 4. Promotes Better Sleep Good skincare routines, particularly those involving evening cleansing and moisturizing, can have a calming and relaxing effect, promoting better sleep quality. Sleep is essential for overall health, aiding in the repair and regeneration of the body, including skin cells. Thus, a good skincare routine indirectly supports healthy sleep patterns. 5. Aids in Holistic Health Practices Practices such as yoga and meditation often emphasize the importance of a connection with the body. Healthy skin can enhance this connection, making such practices more effective. When your skin feels good, it’s easier to feel present and grounded in your body, enhancing the benefits of holistic health practices. 6. Improves Circulation and Detoxification Skincare routines, particularly those involving massage or exfoliation, can improve blood circulation. Better circulation ensures more efficient delivery of nutrients and oxygen to the skin cells, and it also aids in the removal of toxins. This not only improves skin health but also supports the body's natural detoxification processes. 7. Reduces Stress Taking time to care for your skin can be a form of self-care and stress relief. The act of applying skincare products can be meditative and relaxing, reducing cortisol levels and alleviating stress. Less stress translates to better health, as chronic stress is linked to numerous health issues, including heart disease, diabetes, and mental health disorders. 8. Encourages Healthy Lifestyle Choices When you invest time and effort into your skin health, it often motivates you to make healthier lifestyle choices in other areas. This might include eating a balanced diet, staying hydrated, exercising regularly, and avoiding harmful habits like smoking. All these factors contribute not only to better skin but also to overall health. The Role of Skincare Products in Holistic Health At Hygieia Skincare, we believe in the power of natural and nourishing ingredients. Our products are designed to support the skin’s natural functions while ensuring safety and efficacy. We focus on ingredients that offer multiple health benefits, such as: Antioxidants: Found in vitamin C and E, these protect the skin from environmental damage and aid in skin repair. Hydrating Agents: Ingredients like hyaluronic acid and glycerin help in maintaining skin hydration, crucial for its barrier function. Natural Oils: Oils like jojoba and almond provide essential fatty acids, promoting skin health and elasticity. Conclusion: Skin Health as a Window to Overall Wellness Maintaining healthy skin goes beyond superficial beauty. It's about nurturing your body's largest organ to enhance your overall health. By incorporating a holistic approach to skincare, we not only improve our skin's condition but also contribute positively to our mental, emotional, and physical well-being. At Hygieia Skincare, we are committed to helping you achieve not just beautiful skin, but also a healthier, more vibrant life. Remember, when you take care of your skin, you take care of your health.
Learn more
What Is A Healthy Amount of Sunshine in Winter and Its Benefits? A Comprehensive Guide
Understanding the Importance of Sunshine in Winter Winter, often characterized by shorter days and less sunlight, poses a challenge to maintaining optimal health and well-being. The role of sunshine during these colder months is pivotal, not just for physical health but also for mental wellness. In this article, we'll explore the scientifically-backed benefits of sunlight in winter, how much exposure is considered healthy, and ways to safely soak up the sun. The Science of Sunshine: How Sunlight Affects the Body Sunlight plays a crucial role in numerous bodily functions. It's not just a source of warmth; it's essential for processes like vitamin D synthesis and regulation of our circadian rhythms. Understanding how sunlight interacts with our bodies is key to appreciating its importance, especially in the winter months. Optimal Sunshine Exposure in Winter: Recommended Duration and Timing So, what is the healthy amount of sunshine in winter? Experts suggest that even a brief exposure, ranging from 10 to 30 minutes several times per week, can be beneficial. Timing also matters, with midday sun offering the best potential for vitamin D synthesis. Vitamin D and Sunlight: The Crucial Connection Vitamin D, famously known as the 'sunshine vitamin', is synthesized in our skin upon exposure to UVB rays from the sun. During winter, when sunlight is less intense and people are more likely to stay indoors, maintaining adequate vitamin D levels becomes a significant concern. Mood Enhancement and Sunlight: Fighting Winter Blues Seasonal Affective Disorder (SAD) and general feelings of gloom during winter can often be attributed to reduced sunlight exposure. Sunlight triggers the release of serotonin, a neurotransmitter associated with mood elevation, making it a natural antidote to the winter blues. Immune System Boost: Sunlight as a Natural Enhancer Sunlight exposure has been linked to enhanced immune function. It's believed that the sun's rays help modulate the immune system, which is particularly important during the cold and flu season. Skin Health and Sunshine: Safe Exposure Tips While sunlight is beneficial, it's crucial to balance exposure to prevent skin damage. Tips for safe sun exposure, even in winter, include using sunscreen on exposed skin and being mindful of the time spent outdoors during peak sun hours. Sunshine and Sleep Quality: The Link Between Sunlight and Circadian Rhythms Our sleep-wake cycle, or circadian rhythm, is significantly influenced by natural light. Exposure to sunlight, especially in the morning, can help regulate these rhythms, leading to better sleep quality. Outdoor Activities for Sunlight Exposure: Fun and Healthy Ideas Engaging in outdoor activities is a fantastic way to soak up some sun in winter. Activities like walking, jogging, or even snow sports can be both enjoyable and beneficial for health. Balancing Sunshine and Cold: Dressing for Winter Sun Dressing appropriately for the weather while exposing some skin to sunlight can be a balancing act. Learn how to dress smartly for safe and effective sun exposure during winter. Risks of Overexposure: Avoiding Harmful Effects Although rare in winter, it's still possible to get too much sun, leading to issues like sunburn. Understand the signs of overexposure and how to enjoy the sun safely. Sunshine for Eye Health: Benefits and Precautions Sunlight can also benefit eye health by reducing the risk of nearsightedness. However, it's important to protect your eyes from harsh winter glare, especially in snowy conditions. Sunlight and Bone Health: The Role of Sunshine in Bone Density Vitamin D from sunlight aids in calcium absorption, crucial for bone health. This section explores the connection between sunlight and maintaining strong bones. Indoor Alternatives for Sunlight: Light Therapy and Vitamin D Supplements For those unable to get enough natural sunlight, alternatives like light therapy and vitamin D supplements can be effective substitutes, especially during the darker months. Special Considerations for Children and Elderly: Tailoring Sunshine Exposure Different age groups have varying needs when it comes to sun exposure. This part focuses on how children and the elderly can safely benefit from winter sunshine. Case Studies and Research: Real-Life Impacts of Winter Sunlight Delve into research and real-life examples illustrating the positive effects of winter sunshine on overall health and well-being. Expert Opinions and Advice: Insights from Health Professionals Gain insights from health professionals on the best practices for incorporating sunshine into your winter routine for maximum health benefits. Conclusion: Embracing Winter Sunshine Responsibly To sum up, while the winter sun is less intense, its benefits are substantial. Responsible and informed exposure can lead to significant health improvements. Embrace the winter sunshine, but always in a way that respects your body's limits and needs.
Learn more
Hyaluronic Acid: The Skin Savior for Repairing Crepey Skin
In the quest for youthful, radiant skin, Hyaluronic Acid (HA) has emerged as a superstar ingredient in the world of skincare. Its remarkable ability to combat crepey skin and restore a smooth, plump complexion has made it a must-have for anyone looking to turn back the clock on aging. In this blog, we will explore the science behind Hyaluronic Acid and how it can help repair crepey skin, leaving you with a revitalized and more youthful appearance. Understanding Crepey Skin Before delving into the benefits of Hyaluronic Acid, let's first understand what crepey skin is and what causes it. Crepey skin refers to thin, fragile skin that has lost its elasticity and appears wrinkled, loose, and papery. It is often compared to the texture of crepe paper, hence the name. Several factors contribute to the development of crepey skin: 1. Aging As we age, our skin's natural production of collagen and elastin – two proteins crucial for skin firmness and elasticity – starts to decline. This leads to a loss of skin thickness and elasticity, making it more susceptible to crepiness. 2. Sun Exposure Excessive sun exposure can damage the collagen and elastin fibers in our skin, accelerating the aging process and promoting crepey skin. UV radiation from the sun can lead to the breakdown of these vital proteins, causing wrinkles and sagging. 3. Dehydration Lack of proper hydration can exacerbate crepey skin. When the skin is not adequately moisturized, it can appear dull and lackluster, accentuating fine lines and wrinkles. 4. Genetics Genetics can play a significant role in determining your skin's predisposition to crepiness. Some individuals may have a genetic tendency to develop thinner and less elastic skin, making them more susceptible to crepey skin, even at a younger age. Now that we understand the causes of crepey skin, let's explore how Hyaluronic Acid can help combat this common skin concern. The Power of Hyaluronic Acid Hyaluronic Acid is a naturally occurring substance found in our skin, connective tissues, and various other parts of the body. Its primary function is to retain moisture and keep our tissues well lubricated. When it comes to skincare, Hyaluronic Acid's moisture-binding properties are its key to success in repairing crepey skin. 1. Intense Hydration One of the most remarkable features of Hyaluronic Acid is its ability to hold up to 1000 times its weight in water. When applied topically, it acts as a magnet for moisture, drawing in and retaining water within the skin. This intense hydration helps plump up the skin, reducing the appearance of fine lines and wrinkles associated with crepey skin. 2. Improved Skin Texture As Hyaluronic Acid hydrates the skin, it also helps to improve its texture. Crepey skin often feels rough and uneven, but HA works to smooth the skin's surface, leaving it softer and more supple. 3. Enhanced Elasticity By promoting hydration and moisture retention, Hyaluronic Acid aids in restoring the skin's elasticity. Elasticity is vital for keeping the skin taut and resilient, ultimately reducing the sagging and drooping that can make skin appear crepey. 4. Reduced Wrinkles Fine lines and wrinkles are a common concern for those with crepey skin. Hyaluronic Acid's ability to plump the skin and improve hydration helps to diminish the appearance of these wrinkles, giving your skin a more youthful and rejuvenated look. How to Incorporate Hyaluronic Acid into Your Skincare Routine Now that we've established the benefits of Hyaluronic Acid for repairing crepey skin, it's important to know how to incorporate this powerhouse ingredient into your skincare routine effectively. 1. Choose the Right Products Look for skincare products that contain Hyaluronic Acid as one of their active ingredients. These can include serums, moisturizers, and creams. Make sure the product is suited to your skin type and concerns. 2. Cleanse Your Skin Before applying any Hyaluronic Acid product, ensure that your skin is clean and free of makeup, dirt, and impurities. Use a gentle cleanser to prepare your skin for maximum absorption. 3. Apply Hyaluronic Acid After cleansing, apply your chosen Hyaluronic Acid product to your face and neck. Gently massage it into your skin, allowing it to be absorbed fully. 4. Follow with Moisturizer To lock in the moisture and further enhance the benefits of Hyaluronic Acid, follow up with a good-quality moisturizer. This helps create a barrier to prevent moisture loss. 5. Use Sunscreen Always finish your skincare routine with sunscreen, especially in the morning. Sunscreen protects your skin from UV damage, which can worsen crepey skin. 6. Be Consistent Consistency is key when it comes to skincare. Incorporate Hyaluronic Acid into your daily routine for best results. It may take some time before you notice significant improvements, so be patient and persistent.
Learn more